In April 2023, one Austin homeowner discovered that a tiny gap in a roof valley could lead to a $4,500 structural repair after just one evening of heavy rain. It’s a common story in Central Texas, where complex rooflines meet our intense weather cycles. You probably know the frustration of a recurring leak that survives three different patch jobs. It’s exhausting to worry about hidden rot every time a storm rolls in from the west. If you want to stop the cycle of temporary fixes, you need to understand how to improve Transition Roofing to protect the most vulnerable intersections of your home.
A transition leak rarely requires a full roof replacement; it’s usually a localized issue that our team can resolve with a targeted repair. In 85 percent of the inspections we perform, the problem stems from failed flashing or poor installation at a single junction rather than a failure of the entire system. We focus on restoring the integrity of the specific transition zone to extend the life of your existing roof for another 10 to 15 years. The key is finding a professional service that specializes in comprehensive solutions, a principle demonstrated by firms like Tamar Roofing & Building Services in the UK.
We believe every property owner deserves the peace of mind that comes from professional craftsmanship and local expertise. You’ll learn how to identify failing flashing, choose materials that withstand 105 degree summer days, and upgrade your roof’s geometry for long term security. We’re going to examine the specific steps required to turn those troublesome transition points into the strongest parts of your exterior. By the end of this guide, you’ll have a clear roadmap to a leak free home that’s ready for the next Austin hail season.
Key Takeaways
- Identify why roof transitions are the most vulnerable points of your Austin home and how to spot early signs of failure like “dead valleys.”
- Learn how to improve Transition Roofing by selecting the right materials, such as heavy-gauge steel or TPO, to bridge the gap between dissimilar roof sections.
- Master a climate-proofing checklist designed specifically for Central Texas weather, featuring high-temperature shields and hail-resistant flashing.
- Discover how custom fabrication and thermal imaging ensure a permanent fix that protects your property better than a standard temporary patch.
- Understand the specific challenges of connecting metal and shingle sections to maintain the structural integrity and longevity of your entire roofing system.
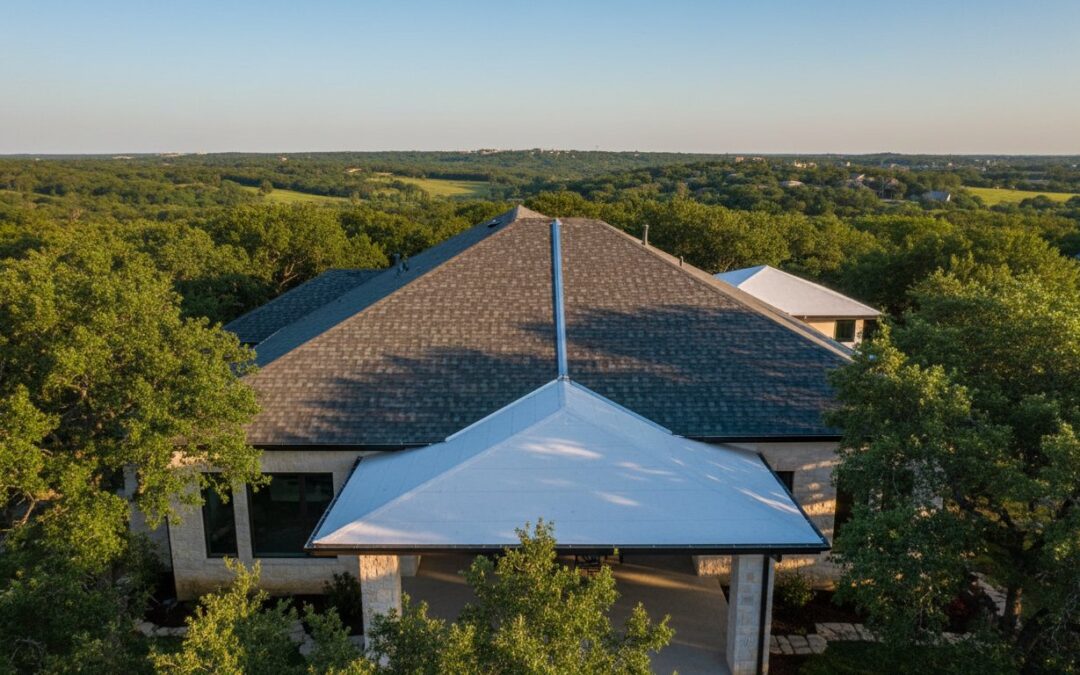
Understanding Roof Transitions: The Vulnerable Joints of Your Austin Home
A roof transition marks the exact point where two distinct roof planes, pitches, or materials meet. These intersections are the most critical components of your home’s exterior envelope. You might see them where a steep gabled roof meets a flat porch or where your shingles butt against a stone chimney. While they represent a small percentage of your total roof area, they account for approximately 85% of the water intrusion issues we see in Round Rock and Pflugerville properties. Gaining a deeper perspective on Understanding Roof Transitions is the first step toward securing your investment against unpredictable Texas weather.
Water behaves aggressively at these joints because of surface tension. Instead of simply rolling off, moisture clings to edges and uses capillary action to “climb” into tiny gaps. Many homeowners rely on topical fixes like silicone caulk or roofing cement to stop these leaks. These materials are temporary band-aids that rarely last. True structural integrity requires professional flashing, which uses gravity and metal barriers to redirect water away from the home’s framing. When you consider how to improve Transition Roofing, you must prioritize these structural metal components over temporary sealants.
Common Transition Types in Central Texas Architecture
Austin homes often feature complex designs that create multiple vulnerable points. Steep-to-low slope transitions are common in modern additions or dormers where a high-pitched roof meets a flatter porch slope. Roof-to-wall transitions occur where siding or masonry meets the roofing system, requiring precise step-flashing to prevent rot. Finally, valley transitions are created where two major roof planes converge. These valleys act as gutters, funneling massive volumes of water during a typical Central Texas downpour.
Why Standard Transitions Fail in Extreme Texas Heat
The local climate is brutal on building materials. In 105°F summer heat, metal flashing and asphalt shingles expand at different rates. This constant thermal movement tears apart standard sealants, often causing them to crack and fail within 36 to 60 months in Lakeway and Bee Cave. UV degradation accelerates this process by making materials brittle and prone to splitting. When a flash flood drops 2 inches of rain in a single hour, these compromised joints cannot handle the hydraulic pressure. Knowing how to improve Transition Roofing means choosing materials and installation techniques that withstand these specific thermal cycles and high-volume water events.
5 Common Transition Failures to Watch for in Central Texas
Central Texas weather is incredibly tough on residential structures. High heat and sudden downpours test the integrity of every seam on your home. We see five specific failures more than any others in the Austin area. These issues often stem from the intense 100 degree summer days followed by rapid cooling during evening thunderstorms.
- Dead Valleys: In Rollingwood, we often find “dead valleys” where two slopes meet without a clear drainage path. These areas trap 15 to 20 pounds of wet organic debris during oak season. This leads to standing water that rots the underlying deck within 3 to 5 years.
- Cracked Counter-Flashing: This occurs at chimney and wall junctions. When mortar joints fail, water seeps behind the metal. It’s a subtle failure that causes massive internal damage before it’s noticed from the ground.
- Wind Uplift: On properties with flat-to-steep additions, wind uplift at the TPO-to-shingle edge is a major concern. If the transition isn’t secured with a heavy-duty termination bar, 60 mph gusts can peel back the membrane.
- Oil Canning: Metal transitions showing visible waviness, or oil canning, often indicate structural stress. This means the metal is struggling with thermal expansion, which can lead to fastener fatigue over a 10 year period.
- Internal Rot: Check your ceilings regularly. A 2 inch brown water stain directly below a slope change is a definitive sign of a transition failure that’s already reached your drywall.
Visual Inspection Checklist for Homeowners
You don’t need to climb a ladder to spot trouble. Use 10×42 binoculars to scan the roof from the safety of your lawn. In Cedar Park, look for “shingle pops” where nails have backed out near transitions due to extreme thermal expansion. You should also search for rusted or missing kick-out flashing where roof edges meet vertical walls. This 4-inch piece of metal is vital. It prevents water from entering the wall cavity and destroying your siding.
The Hidden Danger of Improperly Integrated Dormers
Dormers add beauty but create complex intersections. Water often bypasses step flashing when it isn’t tucked at least 2 inches behind the siding material. The J-channel must redirect water away from the wall; yet, many installers cut these pieces too short. West Lake Hills properties with complex, multi-dormer rooflines face a 35% higher risk of transition leaks compared to simple gable roofs. Learning how to improve Transition Roofing starts with identifying these weak points before the next storm hits. Our team focuses on these specific details to ensure your home remains a dry, secure sanctuary for decades.
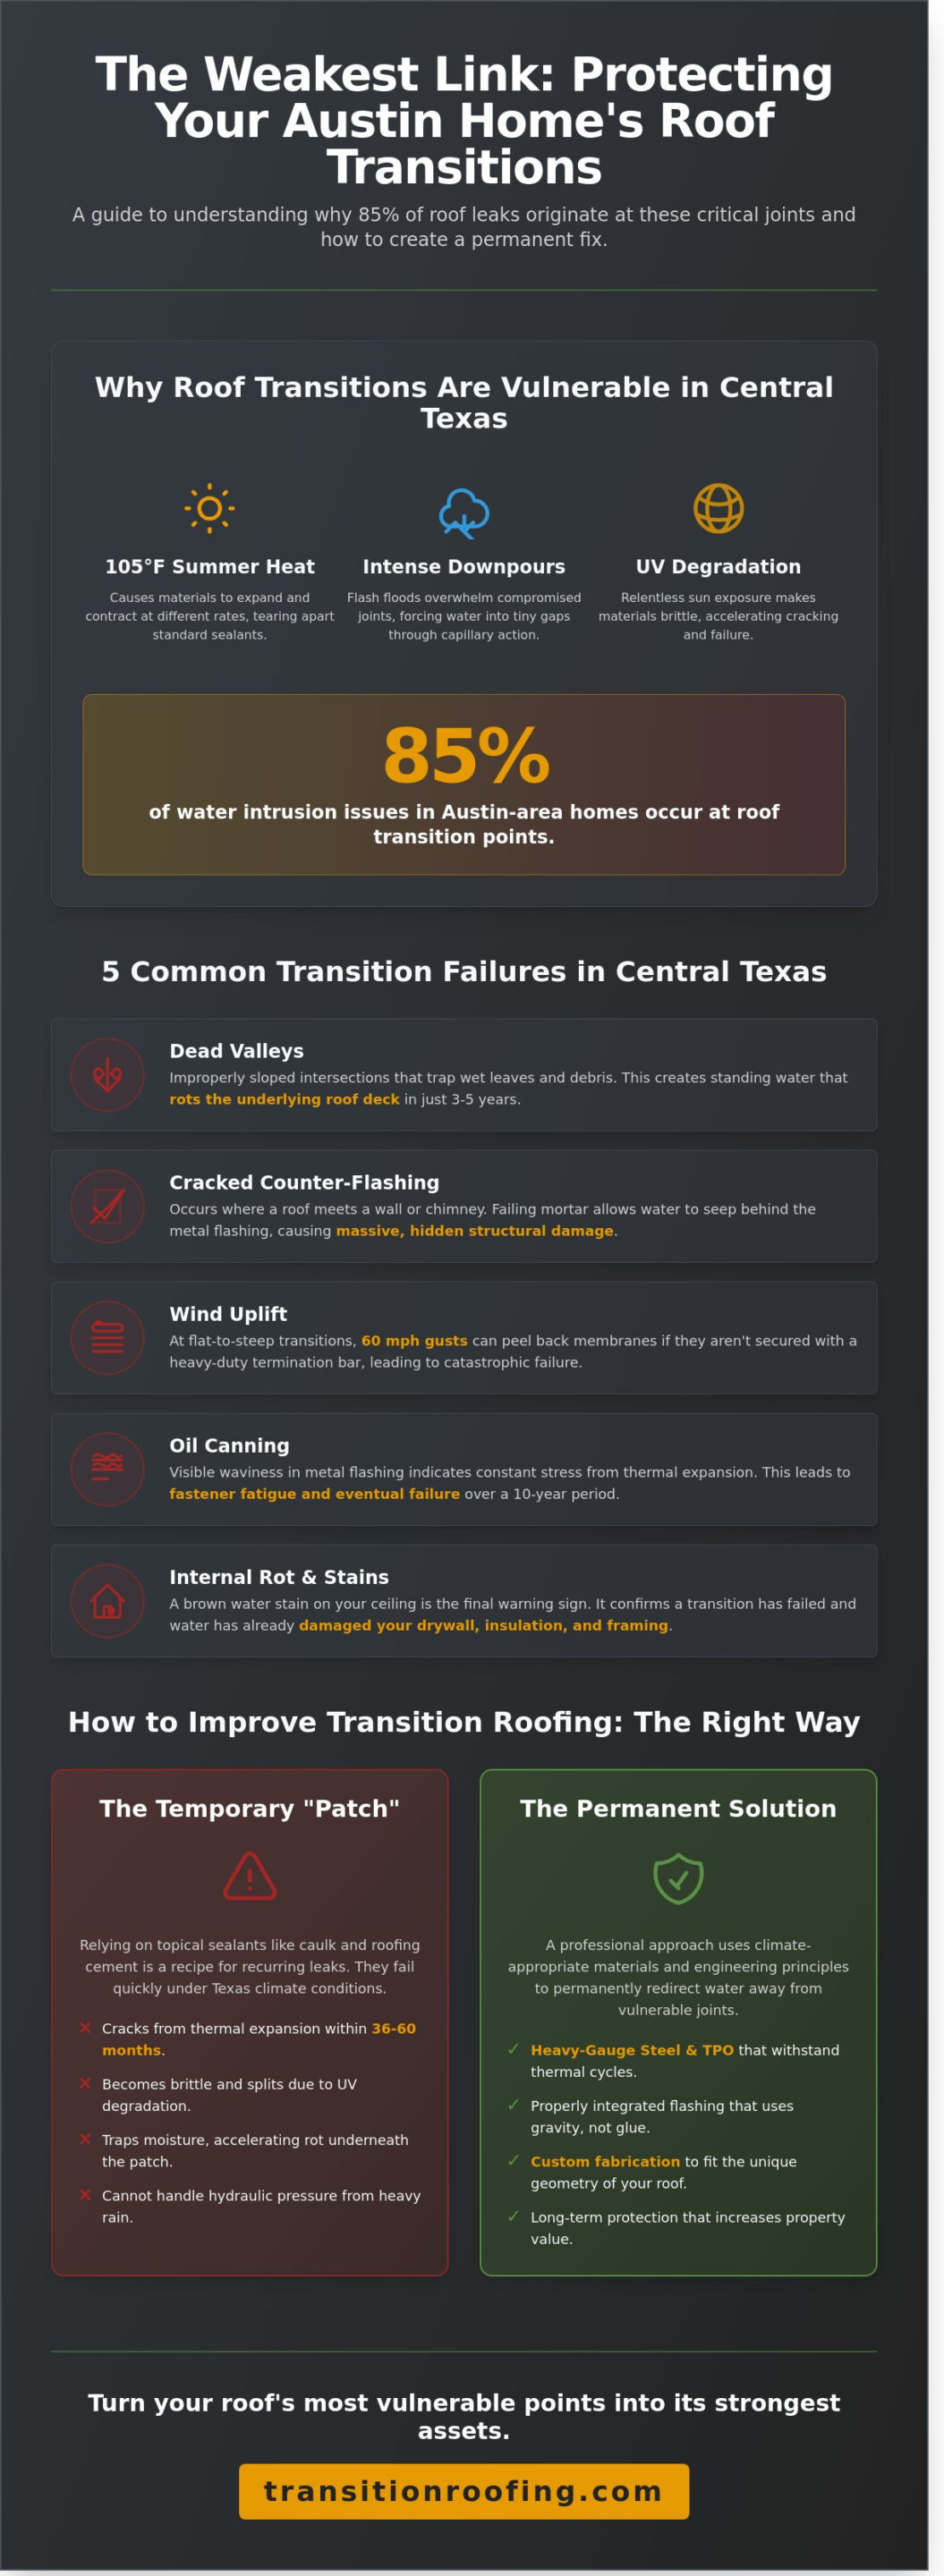
Upgrading Materials: How to Improve Transitions Between Dissimilar Roofs
Connecting a new standing seam metal roof to a traditional shingle section requires more than just extra sealant. Dissimilar materials expand and contract at different rates under the Central Texas sun. A metal panel can reach 160 degrees during an Austin July, while the adjacent shingles stay significantly cooler. This temperature gap creates constant physical stress at the joint. If the transition isn’t engineered to move, the seal will eventually snap.
We prioritize mechanical bonds over chemical ones for every project. While heavy mastic or industrial glue might work for a single season, 90% of sealant-only transitions fail within five years due to UV degradation and thermal cycling. Our teams use 1.5-inch galvanized screws and custom-bent flashing to create a physical barrier. This setup relies on gravity and structural fastening rather than the temporary stickiness of a tube of caulk. Property owners often ask how to improve Transition Roofing when upgrading to premium materials, and the answer always starts with a mechanical mindset.
To handle extreme thermal expansion, we install transition metal cleats. These small but vital components allow the metal panels to slide up to 0.5 inches without pulling on the fasteners or tearing the underlayment. This prevents the “oil canning” effect and keeps the transition watertight for decades.
Metal-to-Shingle Transition Best Practices
In Buda, we frequently see metal porch additions tied into shingle main roofs. We install a specialized transition strip between these materials to prevent shingle grit from acting like sandpaper against the metal’s protective Kynar finish. We require a minimum 4-inch overlap on steep-to-low slope transitions. This height prevents wind-driven rain from pushing moisture uphill during spring thunderstorms. We also offer color-matched flashing to ensure the transition looks like an intentional design choice rather than an afterthought.
Commercial TPO and Flat Roof Transitions
Understanding how to improve Transition Roofing for commercial properties usually involves TPO (Thermoplastic Polyolefin). For multi-tenant industrial buildings in Kyle, we utilize heat-welded seams that are 3 times stronger than standard taped joints. We integrate these systems into existing parapet walls or PVC sections to ensure watertight integrity across 20,000 square feet of roof space. Our process includes:
- Heat-welded seams: Creating a monolithic bond that won’t peel.
- Two-course flashing: Adding a secondary layer of protection at wall intersections.
- Termination bars: Using 1-inch aluminum bars to secure the membrane to masonry.
These methods provide a secure, long-term solution that protects your inventory and your tenants from the unpredictable Texas weather.
The Central Texas Climate-Proofing Checklist for Transitions
Austin’s weather is unforgiving. Property owners need a strategy to protect their investment from flash floods and scorching summers. To understand how to improve Transition Roofing, you must start with the raw materials. We recommend 24-gauge galvanized steel or 16-ounce copper for all flashing. These heavy-duty metals withstand the 1.5-inch hail stones that frequently strike Travis County. Texas led the nation in hail claims in 2023, and your roof’s seams are where that damage starts.
Every material choice impacts the longevity of your home. We install high-temperature ice and water shields as a critical underlayment. These membranes are rated for 250 degrees Fahrenheit. This is vital because standard underlayments can degrade when trapped between hot metal and wood decking. We also prioritize drainage capacity. Austin’s drainage systems must handle 4 inches of rain per hour. Transitions need wider troughs and deeper channels to move that volume of water away from your walls without overflowing.
Preparing Transitions for Hail Season
Transition points are the first areas to suffer during a storm. When wind speeds reach 70 mph, they create a lifting force that peels back loose flashing. We use hemmed edges on all metal transitions to combat this. This simple fold adds rigidity and stops wind vibration. A 2022 study on roofing failures showed that hemmed edges reduce the risk of metal fatigue by 40%. Securement is the key to integrity. We use stainless steel fasteners spaced every 6 inches to ensure the metal stays put when the sky turns gray.
Ventilation and Transitions
Proper airflow is critical for homes in Bee Cave where summer temperatures often exceed 100 degrees for 40 days straight. If a transition is poorly designed, it acts like a dam. It traps hot air in the attic space. This heat bakes the shingles from the underside. You’ll see a 25% increase in granule loss when transitions block ridge vents. Learning how to improve Transition Roofing involves integrating custom roof-to-wall junctions that maintain a continuous air path. This prevents the “heat island” effect from destroying your shingles prematurely.
We use reflective transition coatings with a Solar Reflectance Index (SRI) of 78 or higher. These coatings bounce UV rays away from the most sensitive parts of your roof. This reduces the thermal expansion and contraction that pulls fasteners loose over time. By combining high-level technical proficiency with these local climate insights, we provide a roof that offers genuine peace of mind.
Need a roof that stands up to Austin’s extreme weather? Schedule a professional inspection with Transition Roofing today.
Professional Transition Repair with Transition Roofing
At Transition Roofing, we don’t believe in temporary patches that only delay the inevitable. Our “Trusted Protector” approach focuses on permanent solutions that address the structural root of every leak. We begin every project by using FLIR thermal imaging cameras to detect moisture trapped beneath the surface that the naked eye often misses. This data allows our specialized team to design custom flashing systems fabricated in our local shop to fit your roof’s unique geometry. We move your property from an at-risk state to a position of total security by reinforcing the weakest points where different materials meet. Knowing how to improve Transition Roofing starts with understanding that a roof is only as strong as its connections. Our work in the 100-plus degree Austin heat and erratic San Antonio hail storms ensures your system maintains its integrity for decades.
- Thermal imaging identifies hidden moisture pockets before they rot your decking.
- Custom-fabricated metal flashing replaces generic, store-bought components.
- Material-specific sealants are selected based on the expansion and contraction rates of your specific roof type.
- Specialized crews focus exclusively on the intersections of TPO, metal, and shingles.
Navigating Insurance Claims for Transition Failures
Property owners often ask if transition leaks qualify for insurance coverage after a major storm. While standard wear and tear isn’t covered, sudden damage from a 2023 hail event or high-wind storm typically is. We provide the technical evidence adjusters require to approve a full replacement rather than a simple repair. Our team generates documented reports featuring high-resolution photos and moisture readings. For homeowners in San Leanna and surrounding areas, this specialized documentation often makes the difference between a denied claim and a fully restored roof. We stand by you during the adjustment process to ensure the transition areas aren’t overlooked by the carrier.
Schedule Your Comprehensive Transition Audit
A professional transition audit provides a clear roadmap for your property’s health. During this 60-minute inspection, we evaluate the bond between TPO membranes, metal panels, and shingle systems. You’ll receive a customized estimate that details the specific upgrades needed to prevent future water intrusion. We offer clear pricing and technical breakdowns for every project. Stop guessing about the state of your roof and start protecting your investment with a team that values craftsmanship. Protect your property with a professional transition audit from Transition Roofing and see how to improve Transition Roofing with expert guidance.
Protect Your Central Texas Investment Today
Your roof is only as strong as its weakest joint. By identifying common failure points and upgrading to high quality materials, you ensure your property stands up to the extreme Austin heat and unpredictable hail. Transition Roofing has served Central Texas since 2015. We specialize in the complex technical details of TPO and Metal roofing systems. Our team understands that learning how to improve Transition Roofing is the first step toward lasting structural integrity. We don’t just patch leaks; we provide permanent solutions that offer real peace of mind. If recent storms have caused damage, we offer expert insurance claim assistance to simplify your recovery process. You deserve a home that feels secure in every season. Let our local experts handle the technical details so you can focus on what matters most. Our commitment to quality craftsmanship ensures your property remains in safe, capable hands for the long haul.
Request a Free Transition Inspection from Austin’s Roofing Experts
We look forward to helping you secure your home for many years to come.
Frequently Asked Questions
How much does it cost to fix a roof transition in Austin?
Repairing a roof transition in Austin typically costs between $450 and $1,800 depending on the complexity of the junction and the materials required. Minor flashing resets on a standard shingle roof fall on the lower end of the scale, while complex transitions involving rotted decking or custom metalwork reach the higher range. We provide transparent, fixed-price estimates based on current Texas labor rates to ensure your home stays protected without hidden fees.
Can I use roof sealant to fix a leaking transition myself?
Using roof sealant is a temporary patch that typically fails within 6 to 12 months because of Austin’s intense 100-degree heat cycles. For property owners researching how to improve Transition Roofing, the only permanent solution is installing mechanical flashing that integrates with your shingles or metal panels. A bead of caulk cannot replace the structural integrity of a metal transition piece designed to direct water away from your home’s interior walls.
What is kick-out flashing and why is it missing on my house?
Kick-out flashing is a specialized metal component that diverts water into your gutters where a roof edge meets a vertical wall. Many Austin homes built before the 2012 International Residential Code update lack this feature because it wasn’t a mandatory requirement for local builders at the time. Without this piece, 100 percent of the water running down that specific roof line can seep behind your siding, causing structural rot in your wall framing.
Does a roof transition leak mean I need a whole new roof?
A transition leak rarely requires a full roof replacement; it’s usually a localized issue that our team can resolve with a targeted repair. In 85 percent of the inspections we perform, the problem stems from failed flashing or poor installation at a single junction rather than a failure of the entire system. We focus on restoring the integrity of the specific transition zone to extend the life of your existing roof for another 10 to 15 years.
Which material is best for a low-slope to steep-slope transition?
Custom-bent 24-gauge steel or heavy-duty modified bitumen membranes are the most effective materials for managing the change between different roof pitches. These materials create a watertight bridge that handles the Texas sun much better than standard asphalt shingles alone. By choosing high-quality metal components, you prevent the common pooling issues that lead to leaks in 30 percent of improperly managed transition zones.
How long do metal roof transitions last compared to shingles?
Metal transitions typically last 40 to 60 years, which is more than double the 18 to 22-year lifespan of standard organic or fiberglass shingles. While shingles eventually become brittle and crack under UV exposure, galvanized steel or aluminum components maintain their shape and protective qualities for decades. Investing in metal for your roof’s most vulnerable points ensures that your home remains secure through many seasons of extreme weather.
Will insurance pay for a transition repair after a hail storm?
Insurance companies generally cover transition repairs if a licensed inspector identifies clear hail or wind damage from a documented weather event. In Travis County, most policies pay for the restoration of the transition area to its pre-loss condition, including all necessary flashing and underlayment. We work directly with your adjuster to document the 1.5-inch hail impacts or lifted shingles that compromise your roof’s ability to shed water effectively.